Imagine this: a nice sunny day, not too hot, not too cold. You with a nice cup of coffee or a big glass of wine (we don’t judge). All while you sit on your porch and silently view (spy?) on your neighbors. Well, that was my thought but unfortunately, we didn’t have a front porch on our house. Coming from the Caribbean, where no matter the style of house, you always found a front porch also known as ‘Galeria’. I needed to have one and as always my dear Marido went burger king on me and said “have it your way!” So, operation DIY front porch with pergola went underway. First, like any other project we needed a plan.
The Plan
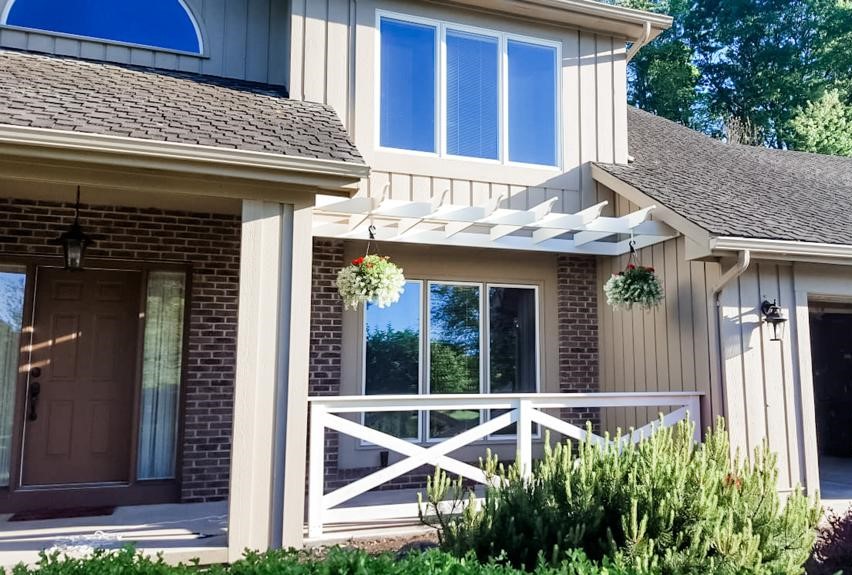
Thankfully our house had the perfect spot to be able to easily add a porch. We just needed to rework some landscaping and decide if we wanted roofing or not. Since we don’t get a lot of sun in that area I thought we could do a pretty little pergola as an overhead cover for our porch. Ultimately, we decided on extending the existing concrete from the portico to the garage. Adding a pergola for filtered shade by attaching it to the existing roofline and along with a matching railing as well.
Before


The Foundation
First we measured how big we were going to make the porch. Next, we decided what type of foundation we would use. We could have gone the route of wood, or even gravel, but we ended up choosing to pour concrete to keep a consistent look between the front entry and the new area. We removed the plants and transplanted them to the back yard.


Now we were ready to pour the concrete. This is the part where our “DIY front porch with pergola” was not so DIY. We actually hired somebody for this job. After that was done, it was on to the pergola.

The Pergola and Railing
Now, this part of the project was all up to Marido to make it happen. We will split it into 2 sections which will be the pergola and then the railing.
Materials:
- Deck lumber and galvanized steel hangers
- White paint
- 3″ and 1.5″ exterior screws
- Jigsaw
- Circular saw
- Drill driver
- Masonry bit, concrete anchors, post plates and screws
Disclaimer: If attempting this or any similar project remember to use standard safety guidelines, you are responsible for your own safety.
The Pergola
First, we measured and cut to size a 1″x6″x12′ treated pine board. Our new porch was about 4″ shy of 12′ long. We attached this section directly to the base of our wood siding, just below the second story window using three 1.5″ screws, every 18″. Then we measured, cut and attached two 6′ the side pieces one to the existing entry and one to the garage making sure everything was level and plumb.

We installed one joist hanger at the end of each of the pergola frame side supports using 3″ screws. Now it was time to finish the frame of this pergola by attaching the floating joist. We used 1″x6″x12′ treated pine board, measured and cut to size. Using our trusty little giant ladder it was lifted, placed and fastened to the joist hangers previously installed.
Cross Beams
We purchased 6 boards of 1″ x6″ x 8′ and cut to 7′ long, which would leave a one-foot overhang of the scroll extensions. Now the hard part, trying to figure out what decorative design to trace and cut on the pergola joist ends. After a few quick sketches and looking online we picked a more traditional style. Something that would work with our home’s exterior characteristic. At this point, we were ready to measure, hand-draw a template and cut each board the design we chose. Yes, no typo here, DRAW THE DESIGN ON EACH BOARD! (That was Marido venting).
We cut offset slots in each joist to give these a pitch away from the house. This would direct water away from the house in case we wanted to install a trellis top to the pergola. The slot at the back was a 1″ x2.5″ cut and the one towards the front was a 1″ x3.5″.

We spaced out each one of the joists to provide symmetry to the porch and attached them using 3″ screws from the top to the frame. This way we wouldn’t be able to see the screw heads when seated below.
And here we have it, everything mocked up, looking good and ready for paint. We took all parts back down and brush in hand we went to town on all the boards. As we watched paint dry, we enjoyed the rest of the evening because the next day we were going to put the pergola back up and start framing for the railing.

The Railing
“This was a piece of cake,” said Marido (who’s afraid of heights and was happy to have his feet on solid ground for the rest of the project). That being said we located the center of the new porch and left 3″ between end posts and existing walls. Using our drill and new masonry bit we started the first hole to install our concrete anchor. That’s when noticed that our battery-powered drill was not made for drilling into concrete. Having only one battery it took us about 3 hours to get the job done, essentially having to fully charge the battery each hole. Once all three holes were completed, we installed a concrete anchor and 4″x4″ post plate to each location.


We measured and cut 4″x4″ treated post to 36″ height and screwed them to the anchored post plates. Then we installed a 1″x6″x12′ cut to size as a handrail, which is wide enough to place cups and bottles we soon found out! Using 1.5″ screws we attached the handrail to the posts making sure everything was level, square and plumb.
For the X’s, we used 2″ x 4″ x6′ treated lumber, propped two of them up and marked the cut sections with a sharpie. Once we had the cut sections marked on each piece of lumber, we cut to length and slotted the inside of the boards to create a notch that both pieces could fit together. We used our pocket hole jig to attach the ends of the X to each post.


Taking a step back to admire our work so far, as we come close to the end. A little bit of paint and voila!! Here it is, our brand new porch complete with a pergola and a railing for safety and aesthetics!


Hope you enjoyed this DIY front porch with pergola post. Little by little, we keep making our house the home we love. Keep in mind, we have basic tools, no workbench, no specialty saws, nothing fancy at all. Just a desire to make our casita beautiful and good spirit [cough! (wine)] to get the job done!
And now that you’ve seen our porch, come on in and take a look around our casita, you can start from our entryway and make your way in. You are always welcome in our home! Tell us what you think, have you created a whole new space in your home from scratch? Share and comment below!