Yes, this is in fact yet another DIY board and batten tutorial! Posts like this aren’t hard to find, and yet here we are! Adding to the 3,600,000 available search results for the term DIY board and batten. So what’s the point? Well, we don’t just want to just be another easy DIY board and batten tutorial, nah-ah! We want to allure you to the dark side and entice you to love all the sexiness custom millwork has to offer. Let’s continue; the safe word is woodwork 😉
Disclosure: This post may contain affiliate links, which means we may be compensated if you make a purchase through any of these links at no extra cost to you.
Disclaimer: Before attempting any project remember to use common sense and practice standard safety guidelines. And careful with those fingers!
We have an obsession, scratch that, let’s call it an addiction to custom millwork. Where and when did this addiction begin? Well, let’s chat about it! And then you will see why we decided to install DIY board and batten along with all of the other woodwork we’ve created in our home and why you will be so persuaded to do so as well.
Our fixation for millwork was not realized until my husband and I decided to custom build our home. We knew we could not afford any of those pretty frills. What we were left with was a pretty standard builder-grade home, nothing stimulating there. We were even lacking a romantic fireplace, as that was an upgrade. But it was nice, clean and new. What else could we want? Well, plenty! Through magazines and searches on the internet, we began to realize that our home was definitely missing something. There was much to be desired.
Your home should be a place that beckons you to enter and explore every spot. With every thrust a hammer has nailed, and every screw that has been drilled, the home has been fulfilled with character and soul. What happens to you when you enter a home bursting with such attributes? Your senses are aroused as every detail leaves you hypnotized. You feel its depth and disposition. Persuaded by the beauty and functionality, you feel you could surrender yourself to its warmth. You’d now rather stay in, than ever leave its comfort.
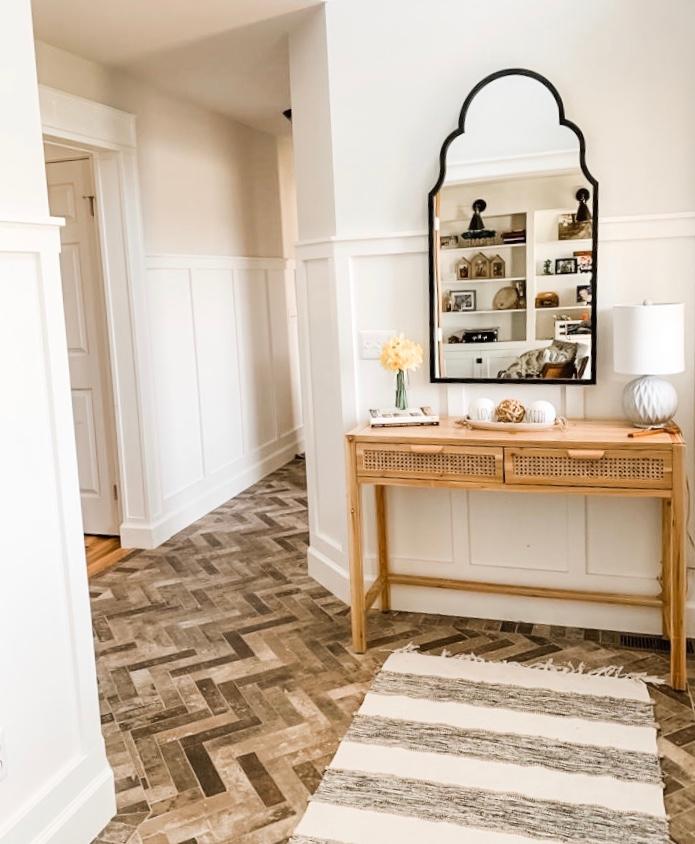
We always wanted to explore board and batten, but it hadn’t taken priority. The first venture with board and batten was in our powder room. After that we were hooked! We started in the foyer and garage entry hallway. Off the foyer is the office with custom built-ins and the mudroom closet, where we had already experimented with woodworking.
So we continued the board and batten in the hallway, and then throughout the first floor, into the dining and living room, and finishing at the top of the stairs.
I haven’t heard the safe word yet, so…
Are you ready? Let’s get started…
Tools:
- Finish Nailer
- Air Compressor
- Miter Saw
- Table Saw
- Level
- Square
- Tape Measure
- Pencil
Materials:
- MDF Boards
- 1″ x 3 ” x 8′ (Top Rails)
- 1″ x 4″ x 8′ (Bottom Rails)
- Primed Pine Boards
- 1″ x 2″ x 8′ (Cap Molding)
- 2″ Finish Nails (16 Gauge) (Rails, Stiles, Baseboards)
- 1 1/4″ Finish Nails (18 Gauge) (Cap Molding)
- Paint
- Caulk
- Sanding Block (220 Grit)
Before


After


Step 1: Baseboard Removal
We removed all of the existing baseboard in the areas we were going to be installing board and batten. We kept the baseboard, as we would be using it over the bottom rail of the board and batten. Why? Well because, personal preference and it adds depth.
Step 2: Wall Repair and Paint:
We first chose the height at which we’d like the board and batten top cap to end. For us this was 61″ from the floor (about a little less than 2/3 the wall height). As we aren’t using any center panels, take a moment to note whether there are any damaged areas on the wall in need of repair and take care of it. From there we went ahead and painted the area in white. Trust us it’s much easier to paint this area first (less cutting in).


Step 3: Install Top Rail
We created a spacer for marking where top rail would be attached. Install the top rail using 2″ nails and nail gun, checking for level. For both bottom and top rails, the ends die straight into any door trim.

Step 4: Install Bottom rail
A spacer cut at 4 3/4″ tall was used as a guide for installing the bottom rail. This was so that our baseboard could be attached to it as well, while leaving 3″ of the bottom rail still exposed. The rail is installed using the finish nailer and 2″ nails.
Step 5: Install Stiles
First we created a spacer for the desired spacing between each stile. This spacer changed almost from wall to wall, as some walls would have looked funky if keeping in line with the same spacing. Again, the stiles are installed with a nailer and 2″ nails.


Step 6: Cap Molding
The cap is cut and installed the same way as the top and bottom rails, but using a brad nailer and 1 1/4″ nails. You can install this either right after installing the top rail, or after you’ve installed both top and bottom rails, up to you!
Step 7: Re-installing Baseboard
This part is optional, but we wanted to create more depth by reinstalling our 5″ baseboard. The difference now is that instead of ending straight into trim around doors, we mitered it at an outside 45-degree angle. We also placed scrap mdf from this same project behind the baseboard, at the bottom of the wall as a nailing strip.


Step 8: If Going Up the Stairs
For stairs section, the first thing that we did was go the top of the stairs and make a mark where we wanted the board and batten to end, at the same height as the downstairs section. Once marked, we drew a line from the upstairs, all the way to where it finished in the downstairs section. Now we had a reference line that we could use to make the top rail was at the correct height, throughout the whole run.
The trickiest part of this section was determining the correct angle, where the horizontal part of the downstairs top rail met the angled part of the stairs section. After some trials and tribulations, we determined that the angle was 40 degrees. Once we determined the angle, we cut a piece that was mitered at a 40 degree angle on side and a 45 degree bevel cut on the other end. The 45 degree bevel cut was made in order to be able to make a joint with another piece, since we needed multiple pieces to be able to accomplish the full length of the stair section.
We also followed this same procedure for adding a small piece of trim on the bottom side of the stair section.
For the stiles, we cut a spacer that had a 40 degree miter on both sides. This spacer gave us the same spacing that we had in the downstairs section. Once we had our spacer, we proceeded with cutting the stiles. All of the styles were cut to the desired height and with 40 degree miters on both ends.
We installed the first stile by first placing the spacers nice and tight to the last stile in the downstairs section. Then we placed the stile tight to the other end of the spacer and nailed it in place. Make sure that the style is plumb.
The remaining styles were installed following the same procedure.


Step 9: Time for Filling, Caulking and Painting
Caulk all the seems. Use a wet rag or baby wipes and your finger to run along the caulk cleaning up any excess. Fill all the nail holes using spackle. Wait for the filler to dry, then sand and refill as needed. Using primer, touch up the areas where filler was used. Now, painting is a go! Go on and get all the stiles, rails, cap, and baseboard 2-3 coats of paint, sanding in between coats.

You Are Done!
Take a step back and admire your work. You may be flushed upon the completion of this easy DIY board and batten tutorial, but hopefully you now understand why we are addicted to building and creating all the cozy nooks and sweet spots in our homes.


We hope our easy DIY board and batten tutorial will be the gate you enter to explore all the areas you could spice up in your home. Are you already a lover of DIY woodworking? Share what your first experience was like, we’d love to hear about it!
For items similar to those used in our foyer, check out these finds!


